How To Use Keyframe Animation in Alight Motion – Best Guide 2026
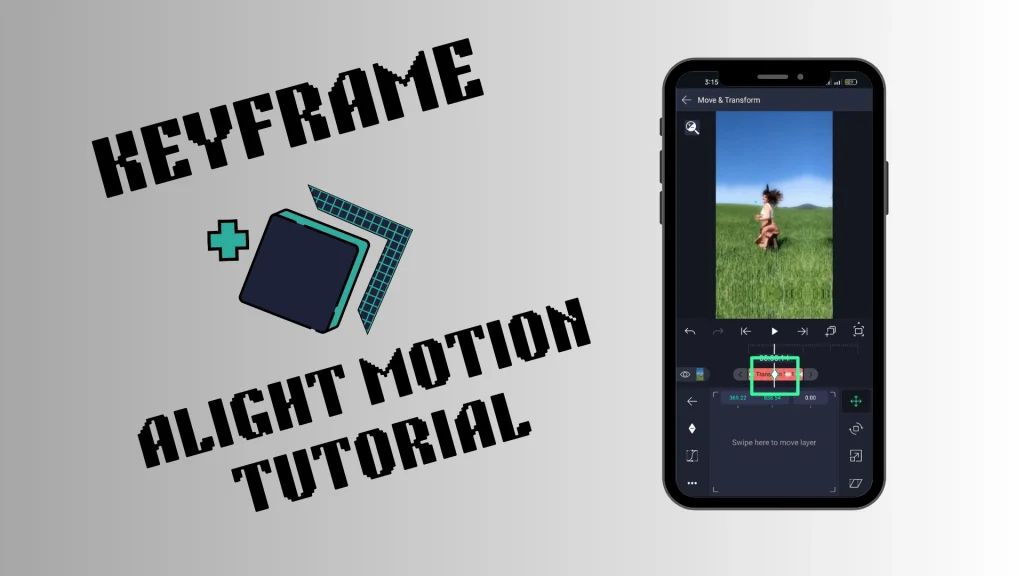
If you’ve ever watched a smooth animation, a clean transition, or a perfectly timed motion effect in a video, there’s a high chance keyframes were the reason of it. If you are video editing enthusiast, and interested In modern video editing,you must know that keyframes are not just a feature — they are the base of smooth motion design. For anyone serious about editing, animation, or content creation, understanding how keyframes work is essential.
For beginners, the concept may feel a bit technical at first, but in reality, keyframes are simple. They define change over time. Whether it’s movement, transparency, rotation, scaling, or effects, keyframes control how one state transforms into another. This is what creates motion, flow, and visual continuity in a video.
In Alight Motion Mod Apk, keyframes are the core tool that allows creators to build animations instead of just edits. Instead of applying static effects, you control how every element behaves across the timeline — frame by frame, moment by moment.
What are Keyframes in Alight Motion?
In simple words, a keyframe is a specific point in time — a spot in the video or animation where you perform a specific editing task like adding text, audio, effects or any other element. You select a specific point in the timeline, and elements like position, opacity, and scale animate smoothly between those points, creating natural movement.
Let me give you an example: for the purpose of attracting the audience, you want to animate text in a specific portion of the video. When that time frame is reached, the text containing important information gently zooms in a little bit to grab attention. This task is fulfilled by selecting the start and end points on the timeline and applying the effect between those points — and this controlled change is what a keyframe is actually used for.
Types of keyframes in Alight Motion-Interpolation Based
Before going into the detailed practical application of keyframes in animations, you must first understand the following types of keyframe animations:
Ease Keyframes
These are the most commonly used keyframes. They work on the principle of acceleration and deceleration to create smooth transitions of elements, instead of changing properties at a constant rate, which often gives an unnatural feel to animations.
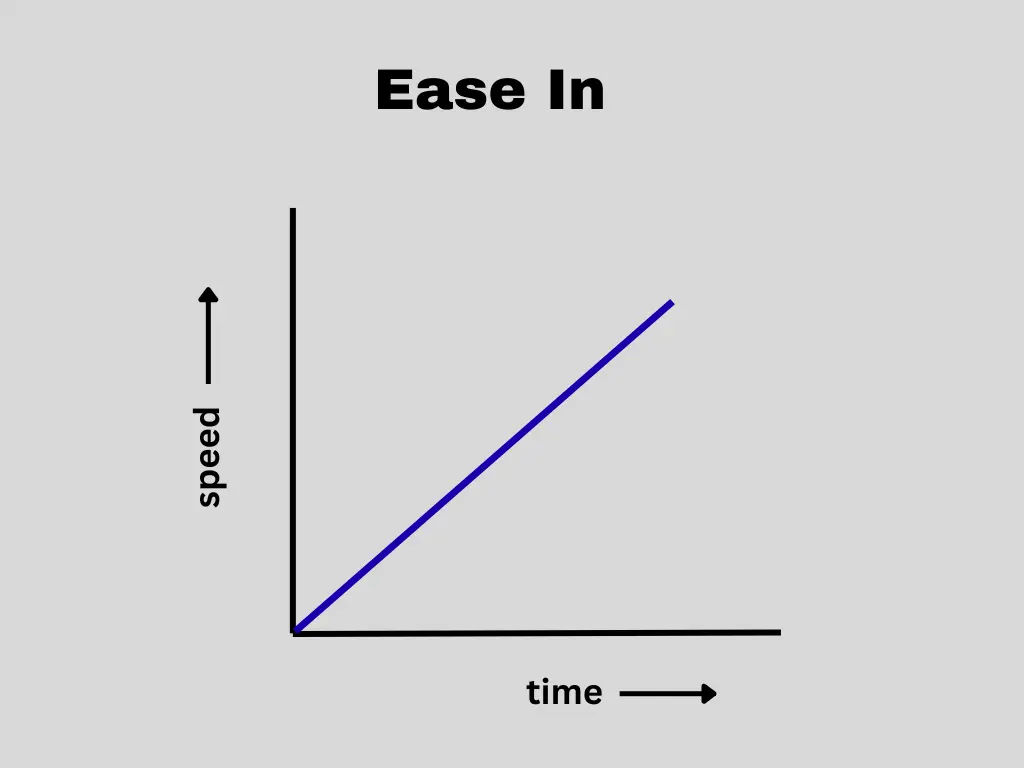
Ease In
In ease-in keyframe animation, the speed of the animation is slow initially but increases as time progresses. This means the speed is directly proportional to time. It is commonly used when an object is leaving the screen.
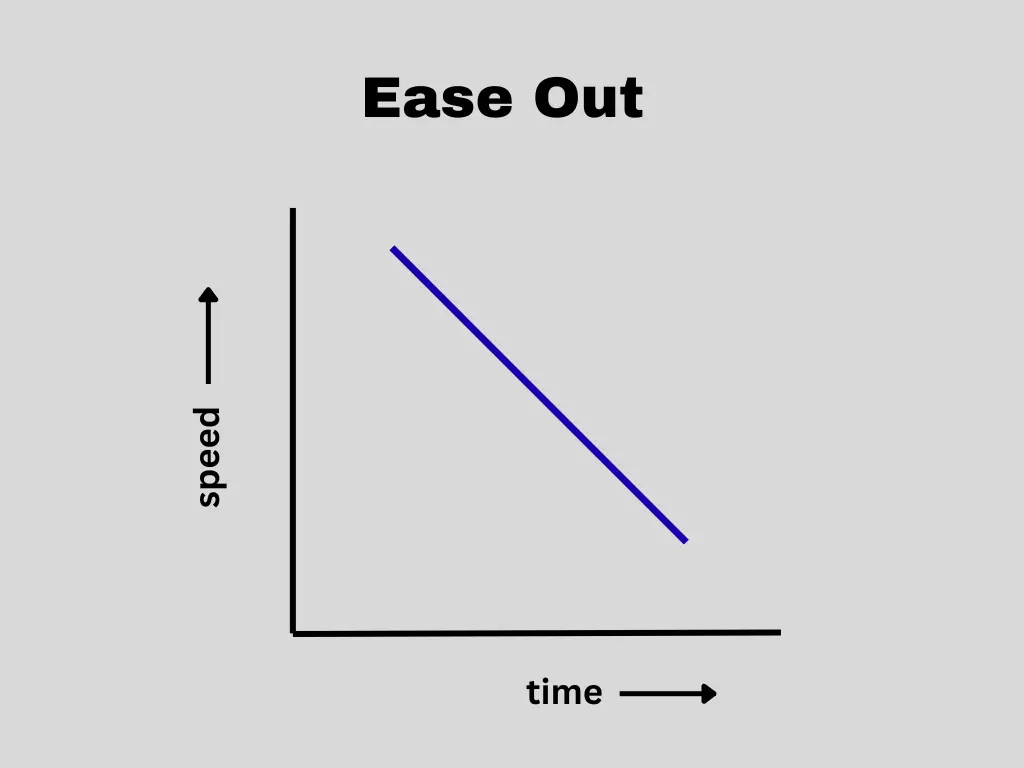
Ease Out
In this type, the speed of the animation is fast at the beginning and gradually slows down with time. This means the speed and time are inversely proportional to each other. It is commonly used when an object is entering the screen.
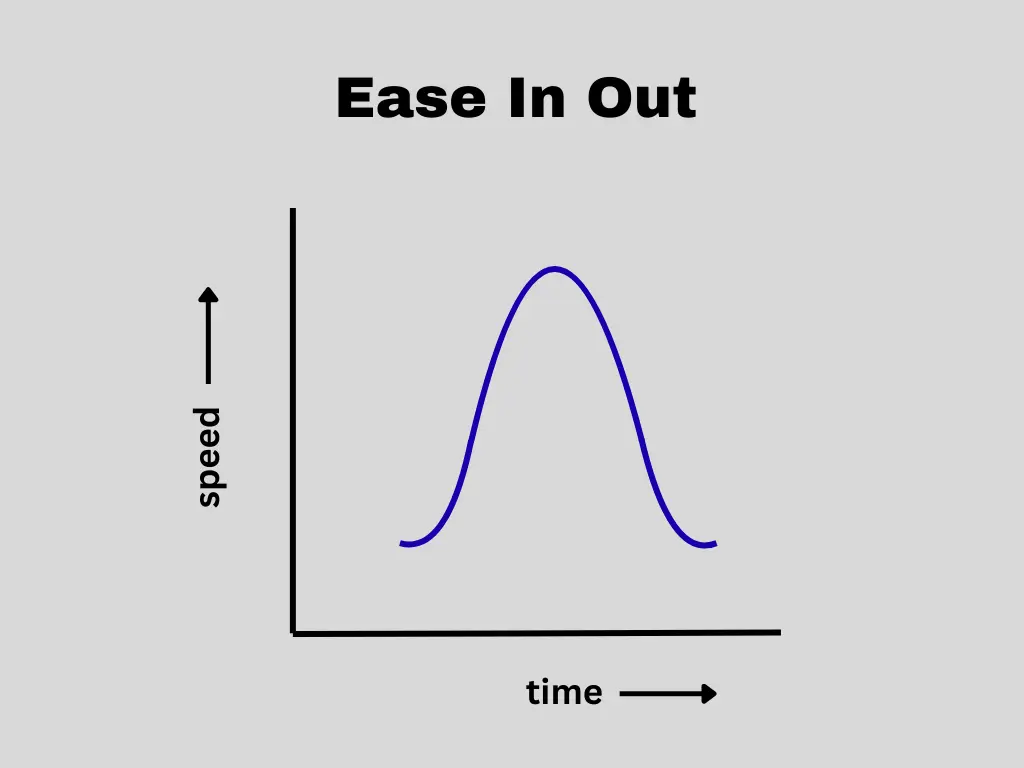
Ease In Out
Ease in out, as the name suggests, is a combination of both. The animation starts slowly, gradually increases in speed, reaches its peak, and then slows down again before ending. It is used when an object does not leave the screen but instead moves from one part of the screen to another.
Hold Keyframes
As the name suggests, these are the types of keyframes where the properties of a specific element stay unchanged between two points on the timeline, until a new keyframe begins. They are also known as static keyframes. They are commonly used when sudden changes of position or rotation are needed within the footage.
Linear Keyframes
These keyframes are used when you want a uniform change over time, with no acceleration or deceleration. The properties of the element change at a constant rate, creating steady and predictable motion. They are used when you want to join two clips with smooth continuity, where visual consistency matters more than dramatic variations or expressive movement.
Types of keyframes – Animation Based
Position Keyframes – Moving Objects on Screen
Position keyframes control movement. If you want a layer to travel from one place to another, this is the tool you use. For example, you might want a title to slide down from the top and settle in the center:
- Place your timeline cursor at the beginning.
- Move the text above the visible screen area and add a keyframe.
- Move forward in time.
- Drag the text to the center and add another keyframe.
Rotation Keyframes – Turning Objects
Rotation keyframes control how an object spins or tilts. Imagine a badge icon that flips slightly when it appears:
- At the starting point, set the rotation to a slight angle and add a keyframe.
- Move ahead in the timeline.
- Straighten the object and add another keyframe.
The object will rotate naturally between those two positions. You’re not limited to full spins — small angle changes can create subtle, stylish effects.
Scale Keyframes – Changing Size
Scale keyframes adjust how large or small a layer appears. Let’s say you want a sticker graphic to pop into view:
- At the beginning, set its size very small and add a keyframe.
- Move a bit forward.
- Increase it to full size and add another keyframe.
This creates a smooth growth effect. You can also reverse this to make elements shrink away.
Opacity Keyframes – Controlling Visibility
Opacity keyframes manage transparency. For instance, if you want background text to gently appear:
- Start with the opacity set very low (or completely invisible) and add a keyframe.
- Move forward.
- Increase the opacity to make it fully visible and add another keyframe.
This creates a clean fade effect. You can also fade elements out the same way.
Color Keyframes – Animated Color Changes
Color keyframes allow you to shift from one color to another over time. For example, you could make a shape gradually change from blue to purple:
- Set the initial color and add a keyframe.
- Move forward in the timeline.
- Choose the new color and add another keyframe
How to Add Keyframes in Alight Motion — Step-by-Step Guide
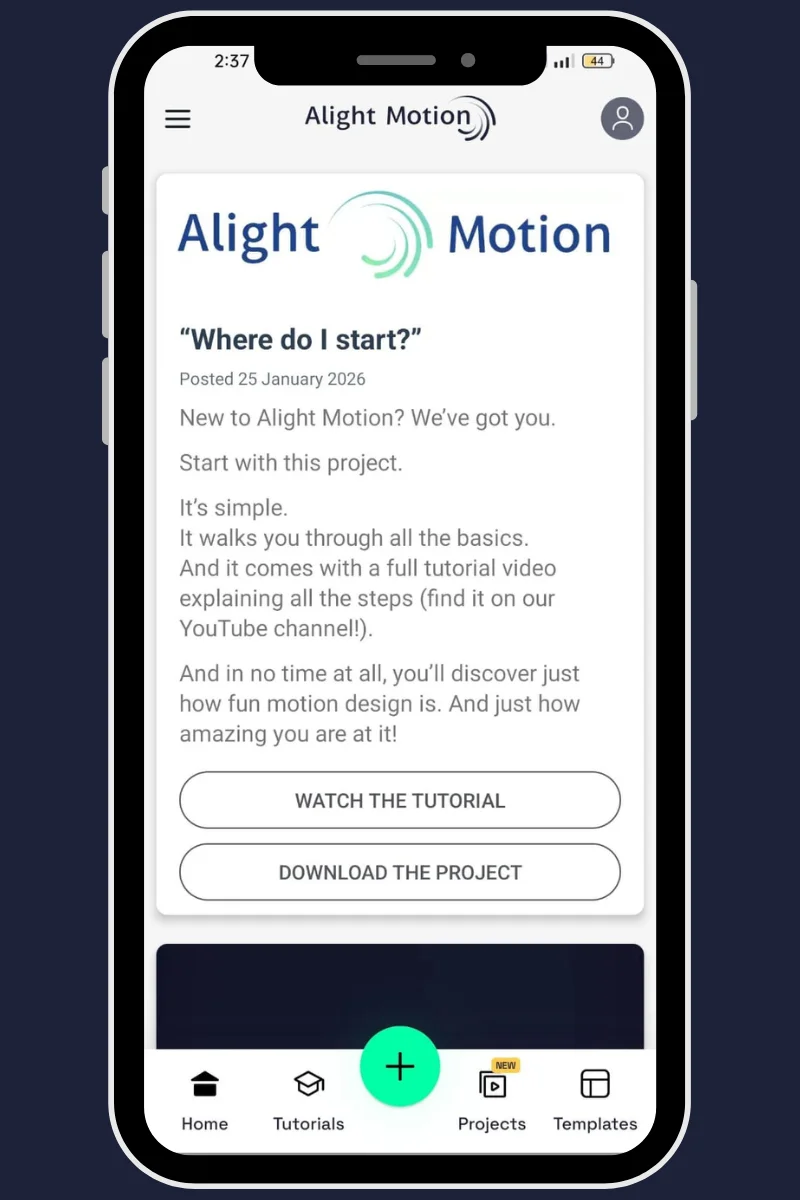
Step 1: Open Alight Motion & Start a Project
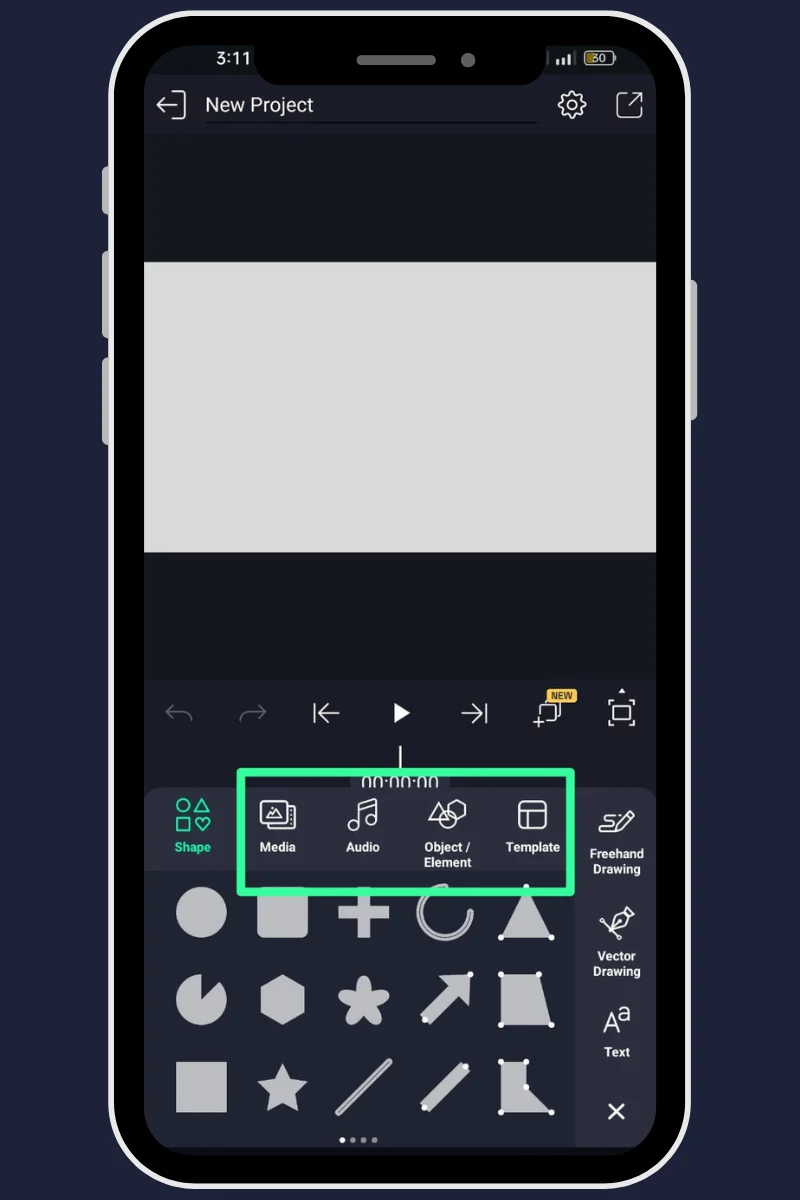
Step 2: Add an Element
Insert the content you want to animate, such as an image, video, text, shape, or any graphic. The element will appear on its own layer in the timeline.
Step 3: Select the Layer
Tap the layer of the object you want to animate. All keyframe actions will apply only to the selected layer, so this step is essential.

Step 4: Open Move & Transform
Go to the editing panel and select Move and Transform. This section controls position, rotation, scale, size, opacity, and motion-related properties.
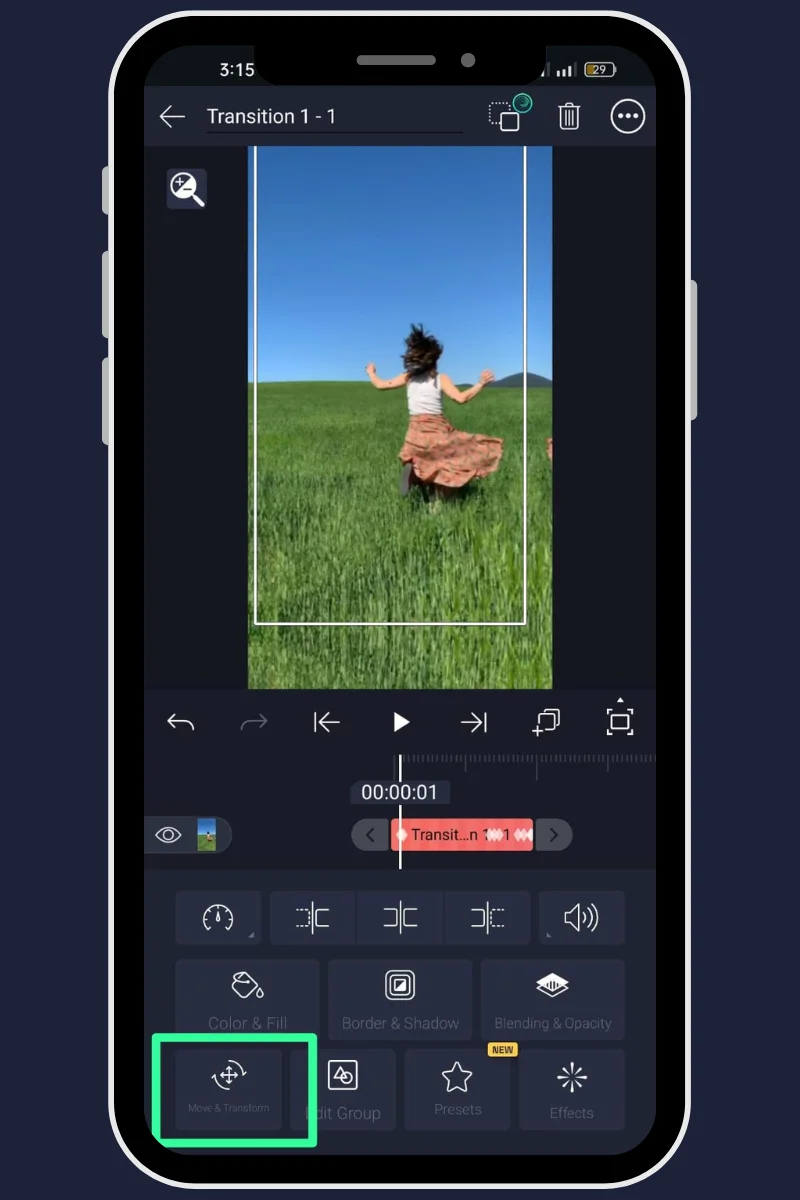
Step 5: Mark the Start Point of the Animation
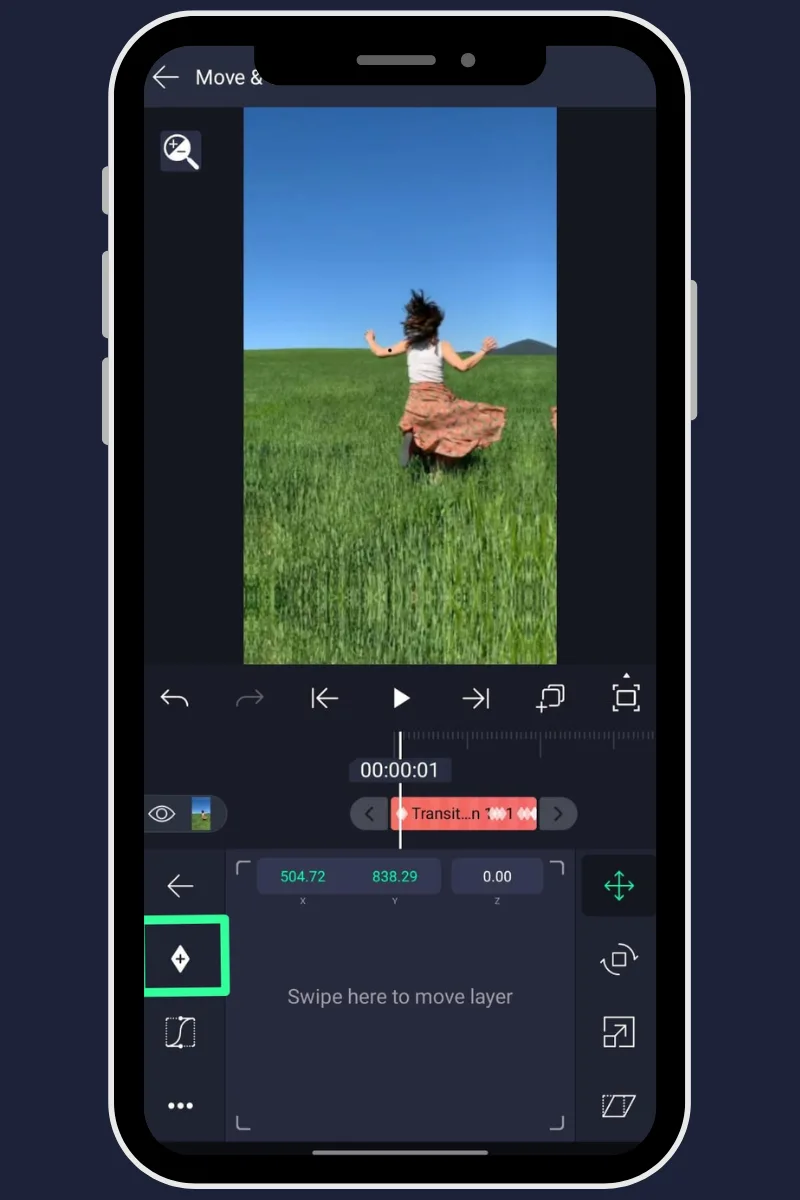
Step 6: Mark the End Point of the Animation
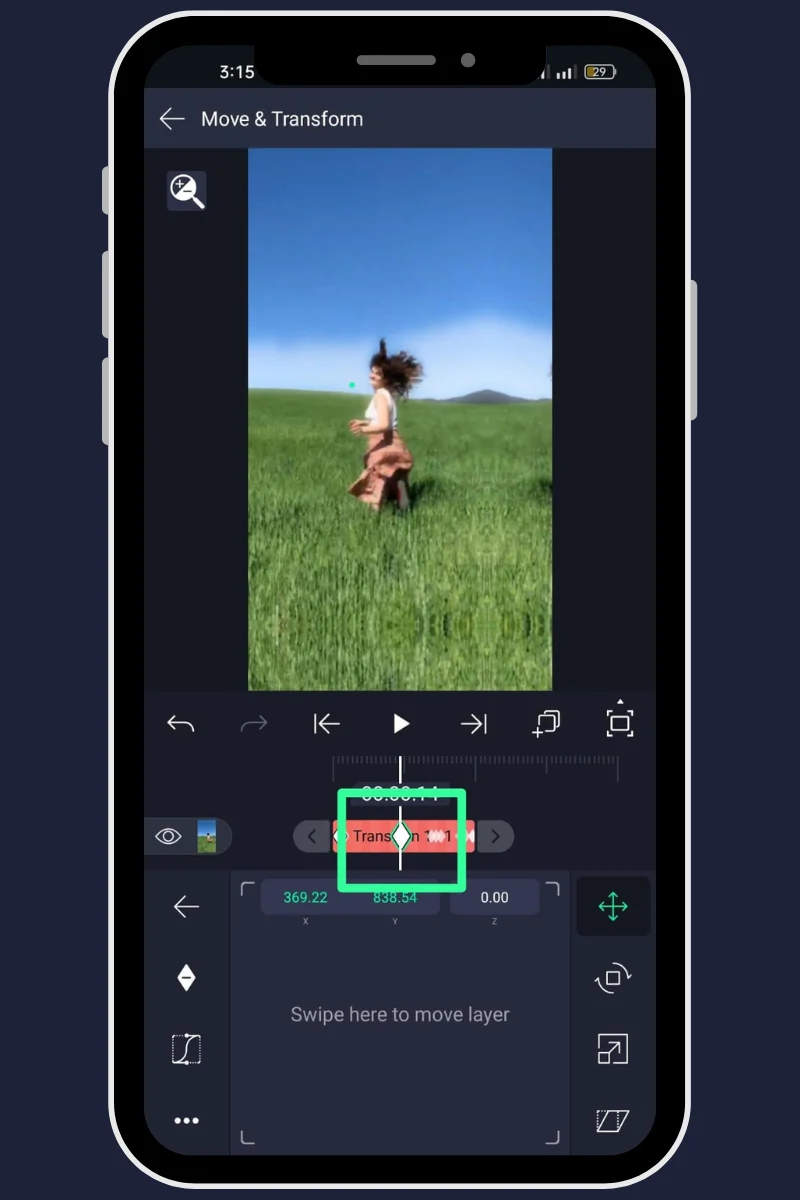
Step 7: Motion Is Now Created
Alight Motion automatically connects the start keyframe and end keyframe, creating animation between them. The distance in time between the two points controls the speed of the motion.
Step 8: Choose Motion Behavior
Select the keyframe type (Linear, Hold, or Ease) to control how the object moves between the start and end points, whether the movement is constant, sudden, or smooth.
Step 9: Preview and Refine
Play the animation and adjust timing, spacing, and values until the motion looks smooth and natural.
Step 10: Save and Export
When satisfied, save your project and export it in your preferred format.
Key Features of Keyframe Animation
Frame-Level Control
Control every change at specific points in time instead of applying static effects.
Smooth Motion Creation
Create natural animations with fluid transitions instead of sharp, robotic movements.
Multi-Property Animation
Animate multiple properties at the same time, such as position, scale, opacity, masks or effects.
Layer-Based Animation
Apply keyframes independently to different layers such as text, images, shapes, videos.
Timeline Precision
Full control over timing, spacing, and sequence of animations using the timeline.
Custom Motion Design
Design your own animation paths instead of using pre-made presets
Easing Control
Control acceleration and deceleration for realistic motion flow.
Editing Flexibility
Edit animations without redoing the whole sequence.
How do keyframes work in Alight Motion?
Keyframes are the basically the starting and ending points in the timeline, you will set these points and the alight motion mod apk will create a smooth transition in between that’s what we called as interpolation.
For example: If you place one keyframe at the beginning with the object facing straight, and another later where the object is fully turned, the motion system will automatically create a smooth rotating movement between those two moments.
Text Animation Using Keyframes
Scale Animation Effect
Start the text at a smaller size and gradually increase it to its full size. This creates a smooth zoom-in animation that naturally draws attention without feeling abrupt or forced.
Opacity Transition Effect
Begin with the text fully transparent and slowly increase its visibility until it becomes fully visible. This produces a clean fade-in effect that improves visual flow and user experience.
Rotation Animation Effect
Apply a rotational motion to the text as it appears, allowing it to rotate into position. This adds dynamic movement and visual interest to the entrance animation.
Using Keyframe Graphs for Precision
Alight Motion provides advanced motion control through its keyframe graph system, allowing creators to shape how animations behave over time. By working with motion curves, you can control acceleration, deceleration, and flow instead of relying on basic linear movement
Creating Popular Effects with Keyframes
Keyframes are essential for building modern visual effects in Alight Motion.
Zoom Transition
Glitch Effect
Slide Entrance Effect
Mask Reveal Effect
Speed Adjustment and Speed Ramping Using Keyframes
Follow these steps to adjust video speed and create smooth speed ramping effects using keyframes in Alight Motion.
Step-by-Step Speed Adjustment
- Import the video into the timeline.
- Select the video layer on which you want to work.
- After selecting the layer, the settings panel will open.
- Tap on Speed to access the speed controls.
- Adjust the speed using the slider:
- Speed set to 1.0 keeps the video at normal speed.
- Speed greater than 1.0 increases the speed and reduces the video duration.
- Speed less than 1.0 decreases the speed and increases the video duration.
Creating Speed Ramping with Keyframes
- Move the playhead to the point where you want the speed change to start.
- Add a keyframe to the speed property.
- Move the playhead to another position on the timeline.
- Change the speed value and add another keyframe.
- Repeat this process at different positions to control how the speed changes over time.
Adding keyframes at multiple points allows you to create smooth speed ramping transitions, making the video feel more dynamic and professional.
How to Copy and Paste the Alight Motion Keyframes
When you’re animating with keyframes, repeating the same motion again and again can slow you down. Alight Motion gives you flexible ways to reuse keyframes so you can keep your workflow fast and consistent—without rebuilding animations from scratch.
Copying and Pasting Individual Keyframes
If you only need to reuse a specific movement or adjustment, copying a single keyframe is the quickest option.
Important tip:
Paste the keyframe on the same layer and same property (for example, Position or Scale). Otherwise, Alight Motion treats it as a new keyframe instead of a duplicated one.
Copying Full Keyframe Animations Between Layers
When you want to apply the same animation style to another object, copying the layer style works better than copying keyframes one by one.
This method is ideal for complex animations because it transfers multiple keyframes and effects together.
Reusing Keyframes Across Different Projects
You can also reuse animations from an older project instead of recreating them.
If multiple layers are involved, copy them one at a time to avoid missing parts of the animation.
Advanced Techniques to Add Keyframes in Alight Motion
Once you’re comfortable with basic keyframing, the real creative control begins. Advanced techniques help you move beyond simple animations and start building motion that feels intentional and expressive. These methods focus on motion quality, timing, and visual storytelling, not just movement.
Use Easing for Natural Motion
Perfectly linear motion often feels robotic. Advanced animations rely on easing to mimic real-world movement.
Shape Motion with the Graph Editor
The graph editor gives you precise control over animation timing and speed. This tool is especially useful when polishing animations that already work but don’t feel right yet.
Build Depth with Multiple Keyframes
Complex animations are usually the result of layered keyframes, not single movements. This approach adds rhythm and visual interest without relying on effects.
Create Custom Motion Paths
Instead of moving objects in straight lines, guide them along intentional paths. Custom paths are ideal for logos, icons, and elements that need personality.
Add Motion Blur for Realism
Motion blur enhances speed and direction, especially in fast animations.
Animate Effects, Not Just Layers
Keyframes aren’t limited to position or scale — you can animate effect properties too.
Combine Keyframes with Masks
Masking and keyframes together allow precise control over where animation happens. This technique is commonly used in text reveals, lower thirds, and focus animations.
Sync Keyframes with Audio
Audio-driven animation adds emotional impact and rhythm.Even simple animations feel powerful when they move with sound.
Experiment, Refine, Repeat
Advanced keyframing is less about memorizing steps and more about observation and refinement. As your eye improves, your animations will naturally become smoother, more expressive, and more engaging.
Why Use Keyframe Animation for Reels & Edits?
Animation is more than movement—it’s how your message reaches the viewer. In Alight Motion, keyframes are what turn static elements into purposeful motion that feels controlled.
Presets can be useful, but they work within fixed limits. Keyframes remove those limits. They allow you to decide exactly how an element moves, when it moves, and how it settles, giving your animation its own identity instead of a prebuilt look. You can shape motion precisely—adjusting position, scale, rotation, opacity, and speed frame by frame.
Another major advantage is consistency. Once you understand keyframes, you can maintain smooth motion across an entire project. Transitions feel connected, movements feel intentional, and nothing looks random or rushed. Keyframes also make it possible to create engaging text animations.
In simple terms, keyframes give you creative authority. They don’t just animate objects—they define how your content behaves, feels, and communicates. If your goal is to produce polished, original animations rather than template-based edits.
Tips to Increase Productivity
Begin with Simple Projects
If you are new to keyframe animation, avoid jumping straight into complicated edits. Start with small tasks like text movement, basic zoom, or a short intro.
Plan the Motion Before Animating
Think about how each element should appear, move, and disappear on screen. A quick sketch or mental outline keeps your animation structured and prevents unnecessary adjustments later.
Keep Timing Consistent
Try to maintain similar durations for fades, slides, or zoom effects so that everything looks connected rather than random.
Use Easing for Natural Movement
Linear motion often looks stiff. Applying easing makes objects start and stop smoothly, which gives a more realistic feel to the animation.
Keyframe Placement and Interpolation
For clean transitions, at least two keyframes are required—one to define the starting state and another for the ending state. Then adjust interpolation to control the speed between those points. Interpolation controls how motion travels between two keyframes.
Speed Up Work with Copy and Paste
Repeating the same animation manually wastes time. Copying keyframes and applying them to similar elements helps maintain consistency and improves editing speed.
Organize Layers and Keyframes
As projects grow, cluttered layers can slow you down. Keeping elements properly named and arranged makes complex edits easier to manage and reduces confusion during adjustments.
Fix Weak Footage with Subtle Animation
Small movements such as gentle zoom, position correction, or fade transitions can improve dull or unstable clips.
Create a Clean Intro Using Keyframes
A short animated intro gives your video a professional feel from the very beginning. You can animate text, logo, or background elements with smooth motion so viewers immediately understand the style and quality of your content.
Preview and Refine Regularly
Always play the animation after setting keyframes. If motion feels too fast, slow, or unnatural, adjust timing or curves until it looks smooth.
Youtube Video Tutorial
Troubleshoot the Common Issues While Adding Keyframes
Working with keyframes in Alight Motion can sometimes feel frustrating—especially when animations don’t behave the way you expect. From uneven motion to missing keyframes, small mistakes in setup can affect the overall quality of your project. Below are the most common keyframe-related problems and practical solutions to fix them quickly and efficiently.
1. Keyframe Not Showing on the Timeline
One common issue is when a keyframe doesn’t appear after tapping the keyframe icon. This usually happens because no property (such as position, scale, rotation, or opacity) has been changed.
How to fix it:
- Make sure you adjust a specific property of the layer.
- Confirm you are on the correct layer before adding the keyframe.
- Tap the checkmark (if required) to save changes.
- Double-check that your project is properly saved
2. Second Keyframe Not Creating Automatically
If you’ve added one keyframe but don’t see a second one, the issue is usually related to playhead positioning.
How to fix it:
- Add the first keyframe.
- Move the playhead forward on the timeline.
- Modify the same property again
3. Animation Feels Uneven or Irregular
Animations can look shaky or inconsistent when keyframes are poorly spaced or when linear motion is overused.
How to fix it:
- Use easing instead of linear motion.
- Try “Ease In,” “Ease Out,” or “Ease In-Out” for smoother transitions.
- Open the graph editor to refine motion curves.
- Ensure keyframes are evenly spaced when needed.
4. Animation Looks Too Slow or Too Fast
Timing issues often occur when keyframes are placed too far apart or too close together.
How to fix it:
- Drag keyframes closer together for faster movement.
- Move them further apart for slower animation.
- Maintain consistent spacing for balanced motion.
- Standardize durations for similar effects (e.g., all fade-ins set to 1–1.5 seconds).
5. Motion Appears Robotic or Unnatural
If your animation feels stiff, it’s likely due to constant speed movement.
How to fix it:
- Replace linear keyframes with easing options.
- Adjust motion curves inside the graph editor.
- Preview and tweak until movement feels natural
6. Keyframes Are Misaligned
Incorrectly placed keyframes can cause sudden jumps or awkward transitions.
How to fix it:
- Zoom into the timeline for precision.
- Enable snap-to-grid for better alignment.
- Drag the diamond-shaped keyframe marker to fine-tune placement.
- Review the timeline before finalizing your project.
7. Keyframe Copying Problems
Sometimes copying keyframes doesn’t work as expected.
How to fix it:
- Tap and hold a keyframe until it highlights.
- Select multiple keyframes if needed.
- Use the copy option from the menu.
- Paste them at the desired timeline position.
8. Partial or Sudden Movements
If animations start or stop abruptly, the easing settings likely need adjustment.
How to fix it:
- Apply “Ease In-Out” for smoother entry and exit.
- Refine the curve in the graph editor.
- Preview frequently to spot harsh transitions early
9. Animation Lagging or Playback Choppy
Lag usually happens when the project is too heavy or contains excessive keyframes.
How to fix it:
- Reduce unnecessary keyframes.
- Lower preview quality.
- Clear unused media or layers.
- Close background apps for better performance.
Exporting and Sharing Keyframe Animations
Once your animation is ready, it’s time to share it. Alight Motion lets you export in several ways
Quick Export Tips
FINAL VERDICT
Keyframes are the foundation of animation in Alight Motion. They allow creators to control how elements change over time by defining starting and ending points on the timeline. Whether adjusting position, scale, rotation, opacity, color, or speed, keyframes make it possible to transform static layers into smooth, dynamic motion.
By understanding interpolation, easing types, motion graphs, and multi-property animation, users gain full control over how their content behaves. From simple text reveals to advanced speed ramping and custom motion paths, every professional-looking animation is built on keyframe control. Instead of relying only on presets, keyframes provide flexibility, precision, and creative freedom.
Mastering keyframes is not optional for serious editors — it is the core skill that turns basic edits into structured, high-quality motion design.


